Scenario: torni a casa dopo essere stato fuori 10 giorni. Hai il riscaldamento a pavimento e decidi di spegnerlo completamente quando parti (–idea sbagliata), invece di semplicemente metterlo a temperatura piú bassa.
Mentre sei via, controlli l’app di Eurotherm, e vedi che l’impianto, si e’ magicamente riacceso dopo tipo due giorni. Provi ripetutamente a spegnerlo da remoto: l’app registra il comando, ma quando ricontrolli trovi sempre l’impianto accesso. Un paio di giorni prima di partire, ricontrolli tutto, e l’impianto e’ acceso, e secondo i vari termometri disseminati nelle varie stanze, la temperatura e’ quella desiderata.
Quindi parti tranquillo.
Torni a casa, dopo varie peripezie, arrivi alle 21:30 (dopo un viaggio durato quasi 24 ore). Inizi chiaramente a nevischiare quando scarichi le valigie (e ti chiedi ogni volta, come hai messo tutta quella roba dentro la macchina), e ti arriva la telefonata di tua moglie (che e’ appena salita con i bimbi mezzi assonnati dopo il lunghissimo viaggio di ritorno, e quindi giá capisci che qualcosa non vá…) e trovi la casa completamente fredda. 10 gradi, punte minime di 7.5 gradi Centigradi. Ti chiede di salire subito e vedere che succede. Fai le scale, portando tipo 3/4 valigie/zaini e borse di varie fattura, (sia mai che facciamo un viaggio a vuoto, ottimizziamo :D), e trovi che l’impianto e’ spento.
Come detto, abbiamo un impianto di riscaldamento a pavimento, con due pompe di calore, e tutte e due sono spente dal controller centrale della Eurotherm.
L’ App della Eurotherm aveva mentito!
Accendiamo l’impianto. Ovviamente l’impianto a pavimento non scalda subito come quello a termosifoni, nel senso che non te la risolvi in un paio d’ore, ma serve piú tempo per portarlo a regime.
Quindi decidi di accendere i condizionatori e scaldare con quelli. Mentre armeggi con i condizionatori (che partono in modalitá estante, e quindi fanno solo piú freddo), intanto controlli le pompe. La pompa reparto giorno funziona, quella reparto notte no. O meglio quella notte parte, ma dice che ha attivato la funzione antigelo.
Fuori e’ freddo serio (stiamo a -1) e quindi si decide che la nottata sará fatta nel reparto giorno. I bimbi dormono sul divano, e noi dormiamo sul letto della camera degli ospiti, che si sta scaldando con la combo condizionatori (adesso in modalitá estate. Mai usata prima)
La nottata passa, ed arriviamo alla mattina, in cui salgo per controllare le famose unitá esterne e scopro quello sopra. Con il freddo che aveva fatto, ed avendo le pompe sempre ferme, quella sopra ha gocciolato su quella sotto, facendo congelare le lamelle usate per lo scambio di calore. La funzione antigelo non e’ comunque riuscita ancora a scongelarla, e quindi la ventola non parte, e quindi non scalda l’acqua del circuito del reparto notte.
Munito di raschietta (e phon) tolgo un pó di ghiaccio. Al momento in cui scrivo non e’ ancora ripartita, ma penso che oramai siamo nella giusta direzione.
Cosa abbiamo imparato:
Quando parti, metti la modalitá vacanza, ed imposta una temperatura piú bassa, ma mantienila. E’ piú sicuro e non ti trovi questi problemi
L’installazione delle pompe in colonna puó andare bene, ma bisogna prevedere un sistema di scolo, in cui la pompa che sta sopra non sgocciola su quella sotto
L’app della Eurotherm non funziona.
Parlando di app e cose che funzionano, cambiando completamente problematica, se volete almeno risolvere la parte relativa ai referti medici ed allo stress connesso con la loro conservazione, consiglio sempre di provare ippocra, in particolare se vi ritrovate in situazioni simili a quelli dei nostri utenti. La prima storia la potete leggere qui. To be Continued.
Update: ho sciolto con il phon il ghiaccio e sono riuscito a farla ripartire. Avanti tutta!
Full disk is never fun, neither on the personal computer, neither on the remote server. It’s a great classic:
you want to install a new game, or you need a new docker image, but your harddrive is full. What do you do?
your server does not respond anymore. You check the stats: hard-drive is full, and you can’t do anything (it’s really hard just to login). What do you do?
So here is a strategy that works very well: delete staff. Or get a bigger disk. As the latin say tertium non datur
One great way to save space is to offload some of the documents somewhere else.
For example I have data in google cloud, and I actually pay the service for having additional space to save my files.
For my medical records, and the one of my family, I actually use https://ippocra.com/, which, on top of providing encrypting data, and auto-categorization per type and per person for the documents, has the smart search, which is a saviour.
In particular, I know my stuff is there and I do not need to worry anymore.
Small caveat: I’ve built Ippocra, because there was nothing even close to that.
How to delete files from the console in linux
So the first thing to do is to understand where we start: df gives you a good idea where you stand.
While working on ippocra.com, I’ve found myself in a bit of a predicament when I was trying to update angular (which they release a new version every 6 months, so it’s kind of something you’ve got to do). I’ve figured out that the classic command that is written everywhere it may works for folks that have a set of dependencies that are pretty standard:
ng update @angular/core@20 @angular/cli@20
That will update form angular 19 to 20. Which is fine. But it may breaqk if you use other dependencies like ngrx .
So here is the thing to update also these in one go:
ng update @angular/core@20 @angular/cli@20 @ngrx/store@latest
That will update everything you need in one go.
If you have a problem with a dependencies, you need to pass it to that command.
E ora Ippocra! I always had the idea to build something like Ippocra, a way to manage your own health records in a way that is easy, secure and simple.
This starts from long time ago. I still remember the first attempt, called myhealthserver which we built in an Hackathon in Cambridge long long time ago (more than 20 years). It was me, Matias (hi there :D) and joined us on the day an MD that was interested in that. It was a two days Hackathon, and we had quite a lot of fun.
After that I did not continue on the same path, but I focused on finishing my joint PhD at the University of Cambridge and EBI. I’ve written quite a lot of software, from 3d neurons visualizer, to algorithms to model the connect biochemical and electrical systems, while fostering a culture of open-source, and tracking code in version control (Git was just invented, and I was showcasing it to my pre-docs community and tried to convince them to adopt it, with a decent rate of success).
Finished the PhD I decided to launch my first startup, SustainableSouk, an en-devour focused on making local food easier to find and order. This was way back, in 2012, when this idea was still super early. I was part of the Transition Cambridge movement and we tried to look at that for a bit. We realized pretty soon that we needed lots of stamps and authorization, treating food and beverage, making the whole enterprise too expensive to launch, and we decided to stop it. Also I did not want to end up managing lots of physical goods, so I switched.
After that I went working for DVLTech, where we start to build Darktrace. I was the one creating the Math Team, and leading it as Head of Math (Hi Tom, Steve, Damian and Valerio!), and I built a whole team from scratch, focused on detecting network anomalies. It was very fun and very challenging, but we had a phenomenal time. I also set up the local basketball Wednesday play, which we used to play in our lunch break, with a phenomenal uptake. I still have a basketball signed by all my former colleagues. As a side hustle I worked on Conduit (Hi Daniel!), which become the second biggest bitcoin exchange in UK for a while.
The love for biology/genomics call me back again though, and I start to collaborate with Sofia Genetics (Hi Tamara!) to build MOKA, a software made on coffee (and not, it’s not an acronym eheh, where we had 3 patents) and which is still used by Sofia Genetics AFAIK.
Then my Seven Bridges years started, where I joined the London office very early on (hi Julia!) and we started to establish the foot print of Seven Bridges in UK and Europe (which at the time was still in the European Union). Lots of fun, proposing the platform to customers to have an easier, faster and reproducible way to do complex research. I’ve soon started to work with the Children Hospital of Philadelphia and the Cavatica platform (Hi Allison and Adam!). This was a phenomenal partnership, where we managed to push the boundaries of possibility, making it the best platform in the world to do research, while making sure that the whole field was advancing with us. Lots of colleagues who I shared really good time at SBG, starting with the folks in my team (hi Surya and Jared), the whole Program team, and the folks in Belgrade office.
This is way I’ve focused very early on on the standards, making sure we had open-standards that were possible to adopt by anyone, in a fast and easy way, and most importantly, they were solving a problem that people had.
This was done under the GA4GH umbrella (Hi Brian, Heidi, Ian, Kurt, David and all the GA4GH Community), where we have invented DRS, Passport, how to connect them, and how to connect these to FHIR. I called this strategy the interoperability triangle, and it was pretty well accepted both at Seven Bridges and also outside (It was adopted by the NIH, and it was also reported in the congressional papers in the senate of the United States of America.)
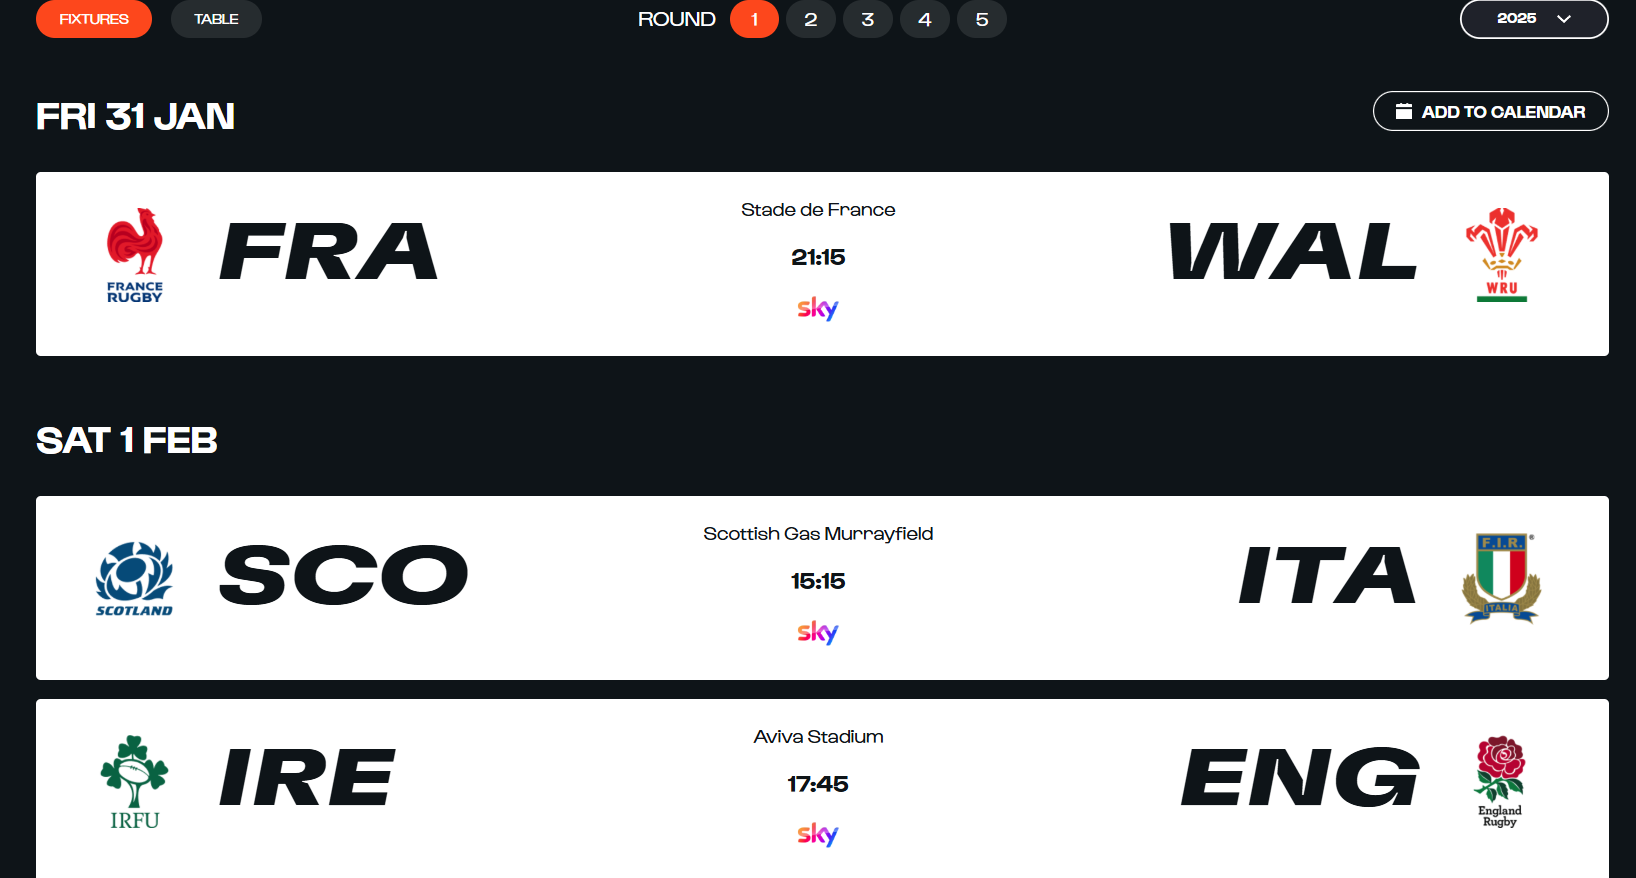
I was looking for a 6 Nations 2025 calendar in the `ics` format, so I could add it to my own google calendar, to have an idea who was playing and what time.
Do you want a calendar file? Give me all your information
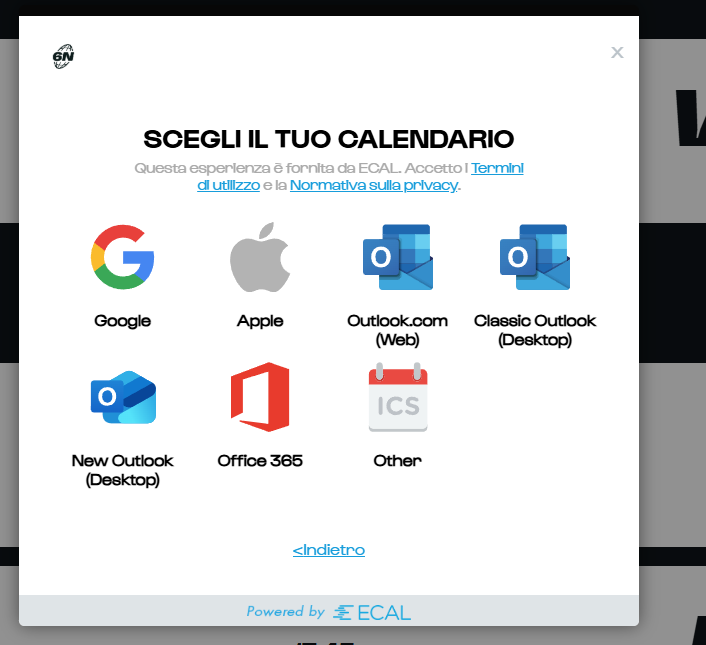
I was taken extremely disgusted by the approach taken by the folks at https://www.sixnationsrugby.com/en/m6n/fixtures/2025, who, when you try to add a calendar, instead of just giving you the file, ask you to provide access to all your google calendars (or equivalent) via the Ecal website.
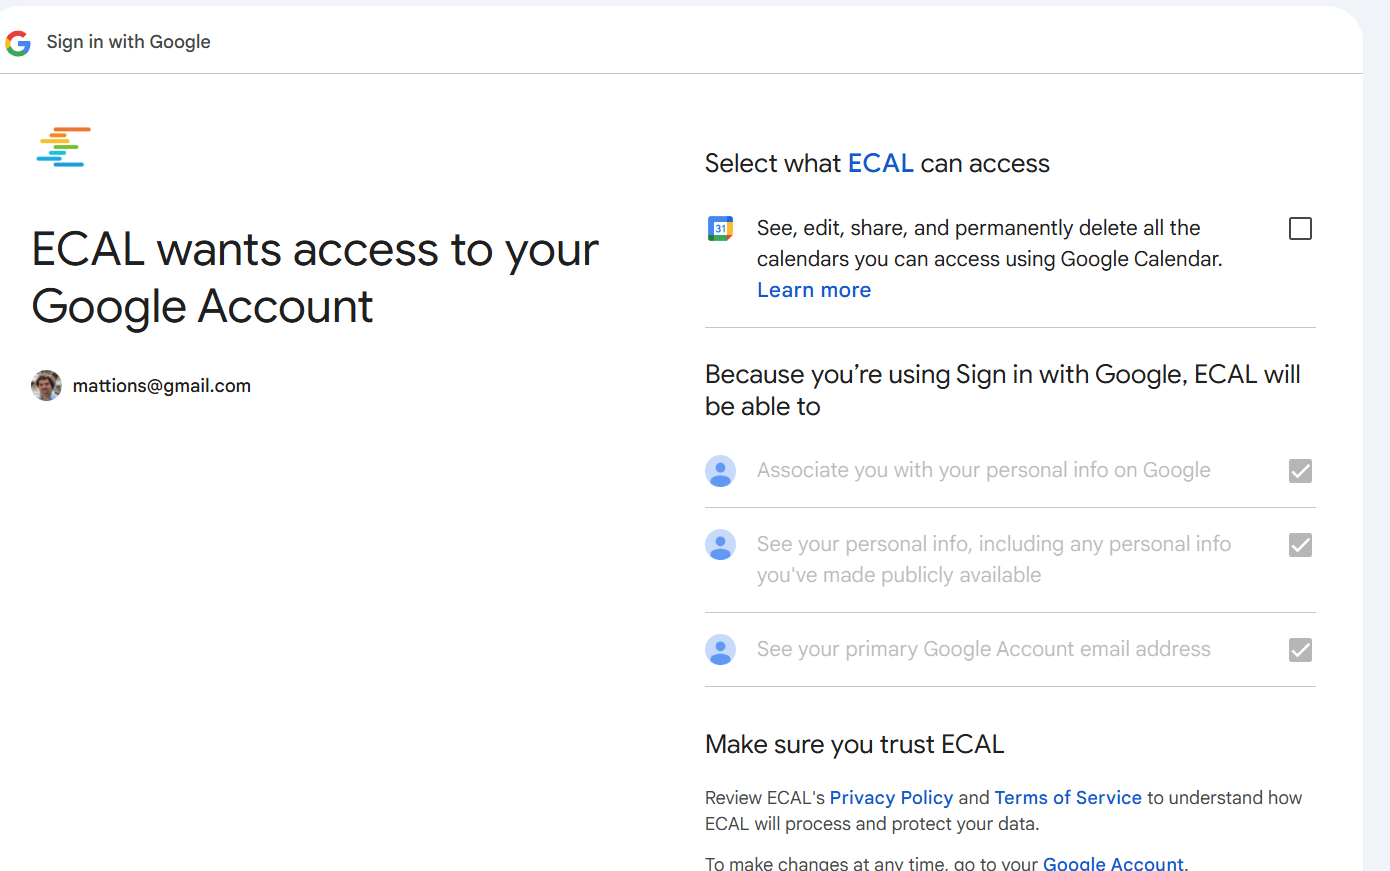
The permissions required are way too broad for such type of request, and it makes no sense.
This is what you see when you try to add the calendar:
Picking google this is what you see:
To track some rugby matches, that are happening between Jan and March, this wants to have a constant access to all my calendars!
The only decent answer is no thank you.
Given the information are available, on when the matches are happening, written in several website, I took that info, I given to an AI and I had that generated the ics for me.
You can find it below. Simply import it in your calendar and should be good. As usual, Forza Azzurri 😀
The Problem: I have two massive blind rollers that are operated by hand. I would like to explore the possibility to lift them using a combination of electric motors and gears.
The main idea is to figure out how to achieve that with very small motors, and have a system that would work not too slowly to be completely useless.
Following the information provided in this post, the problem can be decomposed into two:
The torque of the model. With the right gearboxes also a small motor could lift (slowly) a heavy weight, so that is something that needs to be explored
The rate of which the motor can lift the weight.
While the first one is difficult to calculate, the main idea for the second can be calculated using the following formula:
\[
W= m g h \over t
\]
Where W is the power required to lift a mass m of an height h in a time t. It’s also possible to rewrite as the velocity v on which such mass gets lifted (because v = h/t):
\[
W = mgv
\]
So if we use 10Kg as weight, to lift this at a speed of 1 m/s would require a power:
\[
W = 10 \times 9.81 \times 1 = 98.1W
\]
This is just the beginning of the rabbit hole. I may post updates in the future if I will continue this. We will see.
Update: you can have only one py-script block for now. I removed the example one, and just left matplotlib example.
Pyscrypt has just been released and I feel I had to give it a go straight up from my blog.
The usage seems to be pretty straightforward:
you drop the link to the pyscrip.js in the HTML, and then you have the new <py-script> tag where you can write Python. Standard Python. For example the code below actually gets transformed into a string with the content Now you can!
from datetime import datetime
now = datetime.now()
#print("What time is it?")
#print("Computed directly from Python: " + now.strftime("%m/%d/%Y, %H:%M:%S"))

#print("Now you can use Python within the browser natively!")
Interestingly, you have the full Python arsenal at your disposal.
This code creates a matplotlib plot:
<pre>
<link rel="stylesheet" href="https://pyscript.net/alpha/pyscript.css">
<script defer src="https://pyscript.net/alpha/pyscript.js"></script>
<py-config>
      packages = ["matplotlib", "numpy"]
</py-config>
<div id="mpl"></div>
<py-script output="mpl">
import matplotlib.pyplot as plt
import matplotlib.tri as tri
import numpy as np

# First create the x and y coordinates of the points.
n_angles = 36
n_radii = 8
min_radius = 0.25
radii = np.linspace(min_radius, 0.95, n_radii)

angles = np.linspace(0, 2 * np.pi, n_angles, endpoint=False)
angles = np.repeat(angles[..., np.newaxis], n_radii, axis=1)
angles[:, 1::2] += np.pi / n_angles

x = (radii * np.cos(angles)).flatten()
y = (radii * np.sin(angles)).flatten()
z = (np.cos(radii) * np.cos(3 * angles)).flatten()

# Create the Triangulation; no triangles so Delaunay triangulation created.
triang = tri.Triangulation(x, y)

# Mask off unwanted triangles.
triang.set_mask(np.hypot(x[triang.triangles].mean(axis=1),
                         y[triang.triangles].mean(axis=1))
                < min_radius)

fig1, ax1 = plt.subplots()
ax1.set_aspect('equal')
tpc = ax1.tripcolor(triang, z, shading='flat')
fig1.colorbar(tpc)
ax1.set_title('tripcolor of Delaunay triangulation, flat shading')

fig1
</py-script>
</pre>
      packages = ["matplotlib", "numpy"]


import matplotlib.pyplot as plt
import matplotlib.tri as tri
import numpy as np

# First create the x and y coordinates of the points.
n_angles = 36
n_radii = 8
min_radius = 0.25
radii = np.linspace(min_radius, 0.95, n_radii)

angles = np.linspace(0, 2 * np.pi, n_angles, endpoint=False)
angles = np.repeat(angles[..., np.newaxis], n_radii, axis=1)
angles[:, 1::2] += np.pi / n_angles

x = (radii * np.cos(angles)).flatten()
y = (radii * np.sin(angles)).flatten()
z = (np.cos(radii) * np.cos(3 * angles)).flatten()

# Create the Triangulation; no triangles so Delaunay triangulation created.
triang = tri.Triangulation(x, y)

# Mask off unwanted triangles.
triang.set_mask(np.hypot(x[triang.triangles].mean(axis=1),
                         y[triang.triangles].mean(axis=1))
                < min_radius)

fig1, ax1 = plt.subplots()
ax1.set_aspect('equal')
tpc = ax1.tripcolor(triang, z, shading='flat')
fig1.colorbar(tpc)
ax1.set_title('tripcolor of Delaunay triangulation, flat shading')
display(fig1, target="graph-area", append=False)
Note: If you are trying to use the <py-script></py-script> on wordpress, using a Custom element block, you need to wrap the code with <pre></pre> otherwise wordpress will texturize the text, changing the characters to some more pleasing to the eye. However the HTML is actually executed by the py-script and it will not understand this link.
I had to move to a Windows 10 computer for work, and even if I’m not working a lot on code and so forth, I need sometime to create an ipython notebook or try to launch some code I’ve got from github.
Having the ability to install the ubuntu distribution via the WSL2, directly form the Microsoft Store is a great help. The ability to use Visual Studio which connects to these “magic” area of the filesystem makes also the editing nice and easy.
Usually I like to go with the console, and I’m using the Windows Terminal, which is able to launch several environments in a native way.
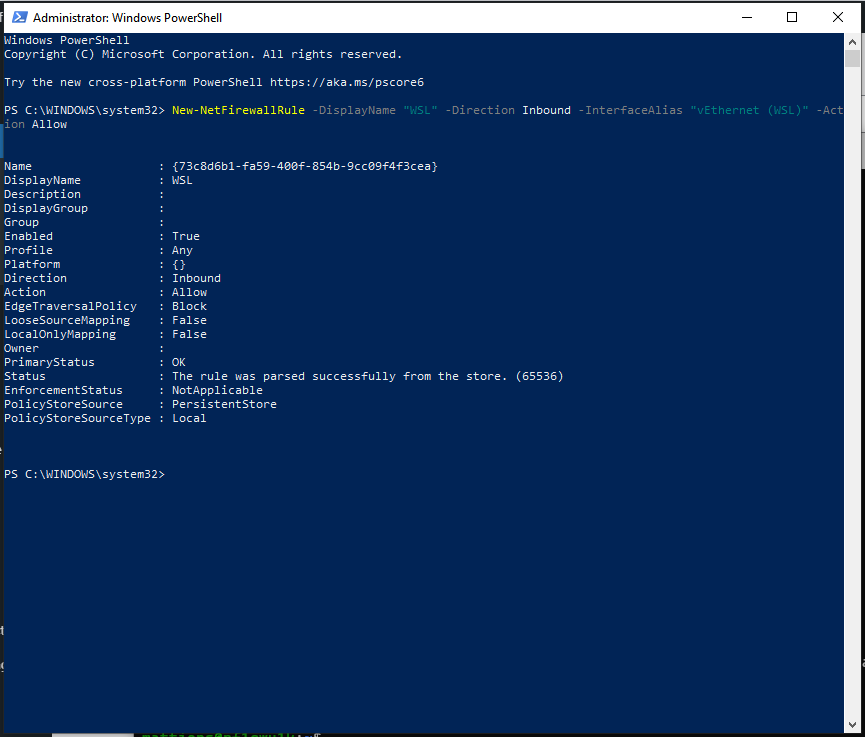
However there is a little snag: you cannot contact the outside world or the internet, because by default the Windows firewall says no.
It’s easy to fix, thogh: Open the PowerShell as Administrator and launch:
After that, you are golden. Unfortunately, for me, I have to re-run that every time I re-boot or come back from a Suspend. I would be very interesting to know if someone figure out how to do it in a permanent way.
Note: Taking a different approach from the classic and latest trend on this blog, this post will be in Italian.
Intro
Sono sempre stato affascinato dalla permacultura, ed in particolare dall’idea di lavorare con la natura, creando e disegnando un sistema complesso, un’ecosistema nel suo piccolo, capace di creare le condizione per ottimizzare la produzione del cibo con il minimo sforzo da parte dell’uomo.
Diciamo che l’idea base della permacultura è quella di osservare, capire, ipotizzare, eppoi interagire. Quindi, anche se il lavoro di tipo manuale è di solito minore, c’è molto piú lavoro di tipo “intellettuale” e di progettazione, ma soprattutto un continuo lavoro di osservazione e di continuo miglioramento. Ho seguito sempre con grande interesse per esempio il lavoro fatto da Geoff Lawson e chiaramente il seminale libro di Bill Mollison. Tuttavia il loro lavoro e di altri permacultori e’ sempre stato incentrato su grandi spazi, io invece ho sempre avuto a disposizione spazi piccolissimi. Da notare che il lavoro fatto con Gardu e Gardenio andava nella direzione di automatizzare il piu’ possible tutto.
Quindi mi chiedevo, come inizio se voglio fare un orto sinergico?
Questo agile manuale di cui sotto vedete uno screenshot molto ben fatto ed mi è stato utilissimo per iniziare il progetto. Ne riporto uno stralcio dell’introduzione:
La gestione di un orto senza fatica, rispettando la natura e le sinergie tra piante e terreno, risulta difficile da credere. Pertanto chi ha sperimentato questa esperienza meravigliosa e intende comunicarla ad altri, ha difficolt a fornire o consigliare unadeguata documentazione poich le informazioni sono disperse in varie pubblicazioni, spesso di difficile reperibilit.
Questo piccolo e agile manuale, poco pi di un opuscolo, scaturisce quindi dallesigenza di raccogliere le informazioni necessarie per dare risposte e stimoli a chi interessato
allargomento e vuole iniziare la coltivazione di un orto sinergico.
Le informazioni riportate in esso derivano dalle esperienze di realizzazione e gestione di orti sinergici condotte dagli aderenti al Circolo di Budrio dellAssociazione E.C.O. e da un
lavoro di raccolta, selezione e sintesi dei vari testi disponibili, cartacei e su internet (vedi cap. 5), di cui si raccomanda comunque la lettura qualora si voglia comprendere pi
approfonditamente gli argomenti trattati.
L’ORTO SINERGICO Coltivare in armonia con la natura
molto utile inoltre e’ stato questo libro: Agricultura Sinergica, di Emilia Hazelip. Infine consiglio anche i video del Bosco di Ogigia e quelli di SuperTranquillo, che toccano alcuni degli aspetti in video dedicati, rendendo il materiale di facile fruizione.
Avendo studiato tutto cio’, ero quasi pronto per passare all’azione.
Abbiamo un piano
Armato di queste conoscenze teoriche ho deciso di ricavare uno piccolo spazio nel mio giardino per piantare veramente pochissime piante e vedere che tipo di risultati avrei ottenuto.
Da notare che il mio giardino si trova in un contesto cittadino, il sole che riceve non e’ costante, bensi’ e’ condizionato dalla presenza di palazzi ed altre case nei dintorni. Inoltre, visto che la casa e’ costruita a ridosso di una collina, i palazzi che sono dietro si trovano ad una altezza ben piu’ alta, facendo si che alcuni punti siano costantemente in ombra.
Ho rimosso delle piante di borraggine (che e’ una pianta spontanea con dei bei fiori blu, capace di attirrare molto api), visto che erano nel posto pi soleggiato ed ho fatto posto per il mio primo tentativo. Nel selezionare le piante ho tenuto conto delle consociazioni, e di quali ortaggi avevo preferenza/voglia di mangiare.
Quindi ho ricavato un aiuola di circa ~70 cm X 400 cm. Vi ho portato dell’acqua con l’irrigazione a goccia e vi ho piantato:
una piantina di pomodori pendolini (presa dal vivaio) [solenacee]
una piantina di pomodori cuore di bue (presa dal vivaio) [solenacee]
una piantina di melanzane (presa dal vivaio) [solenacee]
Un concetto importante da sottolineare: la biodiversita’ creata dalla scelta di piante che consociano in maniera positiva permette di raggiungere diversi obiettivi:
sfruttare al massimo un piccolo pezzo di terreno, dove tutte queste piante possono co-esistere
la varieta’ protegge il raccolto: la presenza di piante diverse non attira grandi quantita’ di insetti nocivi, come nel caso delle monoculture, diminuendo la necessita’ di pesticidi.
la presenza di cosi’ tante piante permette di sfruttare il terreno in maniera ottimale, evitando o diminuendo la quantita’ di piante spontanee
Quanto lavoro iniziale?
Il lavoro manuale piu’ grosso e’ stato fatto verso Aprile, quando abbiamo recuperato tutto il giardino (che era stato completamente lasciato a se stesso) e ricavato la famosa aiuola, con la costruzione dell’impianto a goccia con orologio a pile. Allo stesso tempo ho costruito una piccola compostiera (con le cassette degli agrumi che avevamo dall’inverno) dove ho messo alcuni degli sfalci creati durante il recupero del giardino. Altri li ho usati come pacciamatura.
Qui potete vedere un piccolo video dove parlo del compost e della compostiera:
Il Piccolo stagnetto
Durante il lavoro fatto nel giardino, ho anche creato un piccolo stagnetto, diciamo meglio identificato pi come piccola buco con dell’acqua che viene e v.
L’idea principale dietro a questa realizzazione era la creazione di una fonte d’acqua per i vari insetti e piccoli uccellini che sono presenti nel giardino o in prossimit di questo. Finora ho beccato solo la gatta della vicina.
Lo stagnetto non ha un fondo di plastica, bens l’acqua rimane per un p di tempo grazie alla presenza di argilla compattata che si trova direttamente nel terreno del giardino. Inoltre questo continuo riempimento e svuotamento fa si che lo stagnetto non possa essere usato dalle zanzare per la loro riproduzione.
Proseguimento e raccolto
Una volta trapiantati i pomodori, la melanzana e il basilico (preso da quello che stavo facendo crescere in cucina, credo preso al supermercato), e piantati i fagiolini nani, il nasturzio, il tagete e la calendula ho aspettato i primi frutti. Nel mentre che le piante crescevano, queste venivano legate con delle piccole canne; non ho incannato tutto in maniera super controllata, bens le ho anche lasciate sviluppare in maniera libera in tutto lo spazio disponibile.
La pianta delle melanzane ha fatto solo 4 melanzane: grandezza nella norma, buone. Le piante dei pomodori invece sono state una bellissima sorpresa. La pianta dei cuori di bue ha fatto all’incirca 10 cuore di bue. Grazie a questi abbiamo fatto delle buonissime capresi, utilizzando anche il basilico (consociato) che cresceva tra le due piante di pomodori. Questi erano talmente grandi che ne usavamo uno per fare la caprese per due persone.
Anche la pianta dei pendolini e’ stata super prolifica. Per dare un’idea, non abbiamo piu’ comprato i pomodori partendo da giugno fino a meta’ settembre. In famiglia siamo in tre. Tutti autoprodotti, soltanto con due piante. Secondo me i fagiolini, essendo capaci di fissare l’azone nel terreno hanno enormemente aiutato la capacit produttiva delle piante.
Avendo pianificato il tutto prima e creato questo picolissimo sistema complesso, per tutta la stagione estiva non c’e’ stato alcun tipo di lavoro necessario (niente pesticidi, niente diserbanti).
Soltanto verso la fine di agosto gli afidi hanno preso d’assalto la pianta dei cuori di bue. La pianta non stata pi in grado di portarli a maturazione. Nel frattempo invece la pianta dei pendolini non stata attaccata ed ha continuato a produrre fino a fine settembre.
Sono rimasto talmente soddisfatto da questa pianta di pendolini che ne ho salvato i semi e prover a seminarla per la prossima stagione.
Il piano per il 2021
Visto il successo ottenuto, ho deciso di incrementare e continuare la sperimentatione nel 2021.
Ho aumentato il numero di aiuole da una a tre.
https://www.instagram.com/p/CGrdrUlpQ2D/
Su due di queste ho piantato la fava, che fa parte delle famiglia delle leguminose e sar capace di fissare l’azoto nel terreno. Non terr la fava, bens la utilizzer come sovescio verde (e quindi pacciamatura) per le piante che metter questa primavera. Allo stesso tempo, ho raccolto le varie foglie cadute questo autunno dall’albicocco e dal prugno e le ho messe sopra le due aiuole dove ho piantato la fava.
https://www.instagram.com/p/CHqYTXRJszT/
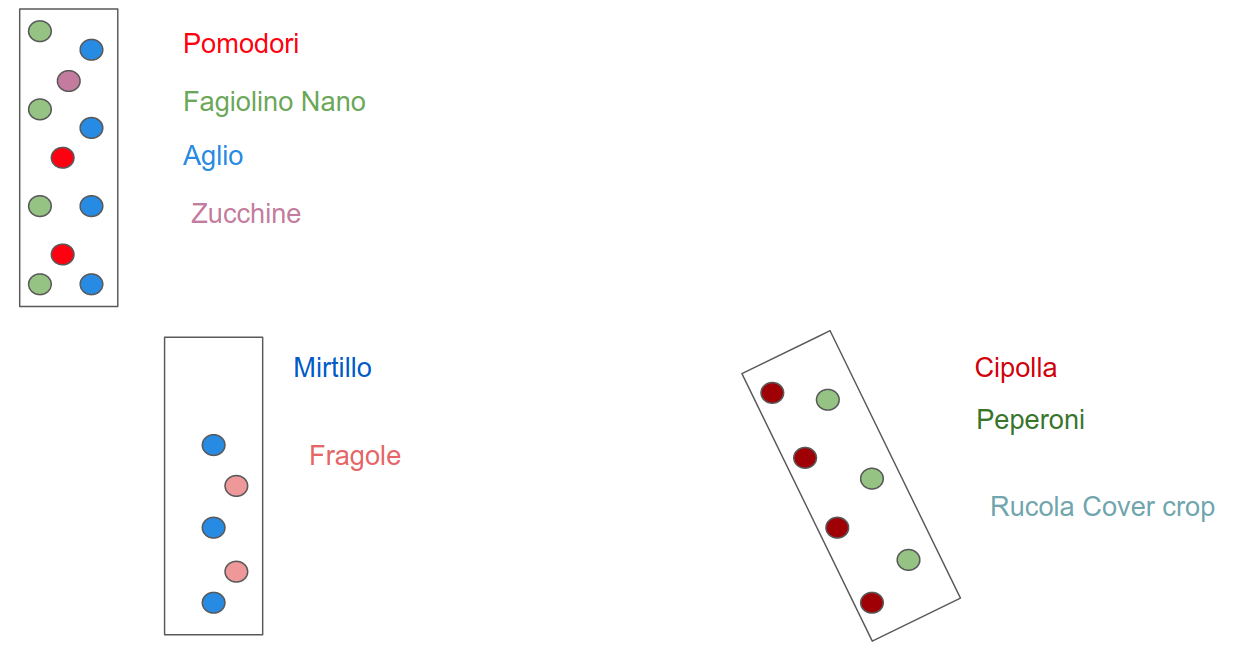
Il piano per le aiuole e’ il seguente:
Piano orto sinergico 2021
La terza aiuola e’ quella dedicata ai mirtilli e alle fragole. Questi, a differenza delle altre piante, vogliono un PH del suolo acido. Per ottenere cio’ invece che le foglie del prugno o del castagno, ho messo gli aghi di pino che contribuiscono ad acidificare il terreno, preparandolo quindi per le fragole ed i mirtilli.
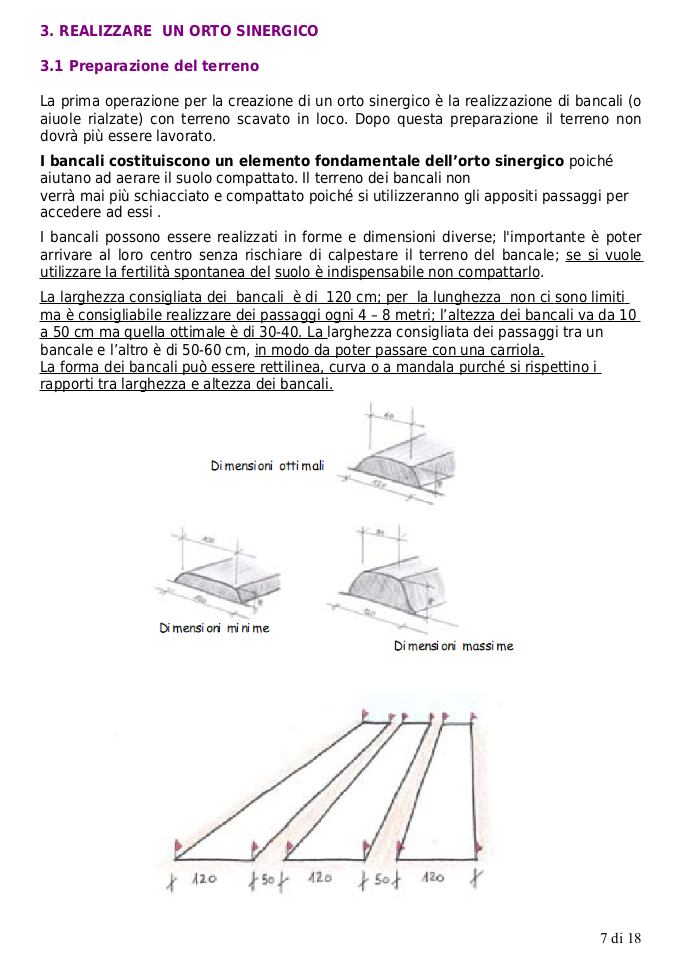
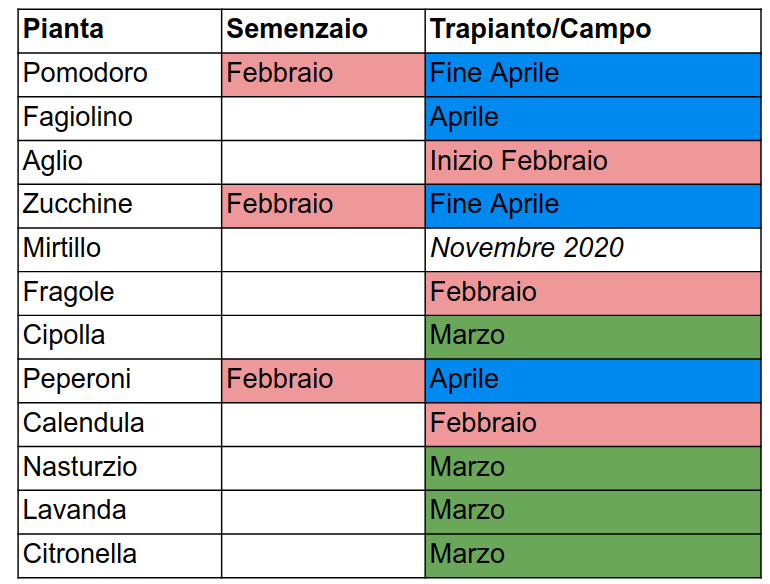
Il calendario delle operazioni il seguente:
Come si vede, oltre ai pomodori, alla zucchina, alle fragole, all’aglio, ai fagiolini, alle cipolle ed ai peperoni, ci sono altre piante ancillari che pianter per ottenere i loro effetti benefici.
In particolare la grande scomessa e’ quella di piantare 3 citronelle ed una lavanda per scoraggiare la presenza delle zanzare, visto che l’estate scorsa erano presenti in quantit enorme. Le probabilit di successo sono poche, ma l’idea principale quella di provare.
Vedremo come proceder.
Ho deciso di raccontare un pochino la mia esperienza, nel caso in cui si riveli utile per qualcuno.
So I’ve got this new computer with Windows 10 because Baldurs Gate 3 is coming out, and I did not have a tower for quite long time. The windows has been installed by the people where I’ve got it, and there is a second partition where I will install ubuntu. Unfortunately on the first go it did not work due to the NVIDIA card inside, (just a GTX 1060, not the new 30 series that everyone is going crazy about it), but the net has already a solution for it, which I will give it a try ASAP I’ve got time.
At the same time I’ve used it to play Heroes of the Storm and I’ve also tried my first stream on twich.tv at https://www.twitch.tv/brownianmotion1 . I stream HOTS in Italian, and it just a quick foray into that world because I’m a curious person.
I’ve used OBS to stream, and it seems everything was working quite well.
Back to the Ubuntu install, given the first try did not really work, I wanted to take a more cautious approach and save the windows key before I had to reinstall everything again, for safe-keeping.
To my surprise new rigs do not came with a sticker which says which is the windows key associated, but it’s written in the UEFI BIOS directly. When I’ve asked the support of the company where to get it, they told me this was attached only to that mother board, and if I was going to change the motherboard I had to get a new one.
While this makes no sense to me at all, given that I bought a personal license for windows, I was not very clear why I should not know the key of the license I bought.
Quick googling (via ecosia) and I found out this video on youtube which provides the solution in no time:
Open A PowerShell and type (Get-WmiObject -query 'select * from SoftwareLicensingService').OA3xOriginalProductKey