Full disk is never fun, neither on the personal computer, neither on the remote server. It’s a great classic:
you want to install a new game, or you need a new docker image, but your harddrive is full. What do you do?
your server does not respond anymore. You check the stats: hard-drive is full, and you can’t do anything (it’s really hard just to login). What do you do?
So here is a strategy that works very well: delete staff. Or get a bigger disk. As the latin say tertium non datur
One great way to save space is to offload some of the documents somewhere else.
For example I have data in google cloud, and I actually pay the service for having additional space to save my files.
For my medical records, and the one of my family, I actually use https://ippocra.com/, which, on top of providing encrypting data, and auto-categorization per type and per person for the documents, has the smart search, which is a saviour.
In particular, I know my stuff is there and I do not need to worry anymore.
Small caveat: I’ve built Ippocra, because there was nothing even close to that.
How to delete files from the console in linux
So the first thing to do is to understand where we start: df gives you a good idea where you stand.
While working on ippocra.com, I’ve found myself in a bit of a predicament when I was trying to update angular (which they release a new version every 6 months, so it’s kind of something you’ve got to do). I’ve figured out that the classic command that is written everywhere it may works for folks that have a set of dependencies that are pretty standard:
ng update @angular/core@20 @angular/cli@20
That will update form angular 19 to 20. Which is fine. But it may breaqk if you use other dependencies like ngrx .
So here is the thing to update also these in one go:
ng update @angular/core@20 @angular/cli@20 @ngrx/store@latest
That will update everything you need in one go.
If you have a problem with a dependencies, you need to pass it to that command.
E ora Ippocra! I always had the idea to build something like Ippocra, a way to manage your own health records in a way that is easy, secure and simple.
This starts from long time ago. I still remember the first attempt, called myhealthserver which we built in an Hackathon in Cambridge long long time ago (more than 20 years). It was me, Matias (hi there :D) and joined us on the day an MD that was interested in that. It was a two days Hackathon, and we had quite a lot of fun.
After that I did not continue on the same path, but I focused on finishing my joint PhD at the University of Cambridge and EBI. I’ve written quite a lot of software, from 3d neurons visualizer, to algorithms to model the connect biochemical and electrical systems, while fostering a culture of open-source, and tracking code in version control (Git was just invented, and I was showcasing it to my pre-docs community and tried to convince them to adopt it, with a decent rate of success).
Finished the PhD I decided to launch my first startup, SustainableSouk, an en-devour focused on making local food easier to find and order. This was way back, in 2012, when this idea was still super early. I was part of the Transition Cambridge movement and we tried to look at that for a bit. We realized pretty soon that we needed lots of stamps and authorization, treating food and beverage, making the whole enterprise too expensive to launch, and we decided to stop it. Also I did not want to end up managing lots of physical goods, so I switched.
After that I went working for DVLTech, where we start to build Darktrace. I was the one creating the Math Team, and leading it as Head of Math (Hi Tom, Steve, Damian and Valerio!), and I built a whole team from scratch, focused on detecting network anomalies. It was very fun and very challenging, but we had a phenomenal time. I also set up the local basketball Wednesday play, which we used to play in our lunch break, with a phenomenal uptake. I still have a basketball signed by all my former colleagues. As a side hustle I worked on Conduit (Hi Daniel!), which become the second biggest bitcoin exchange in UK for a while.
The love for biology/genomics call me back again though, and I start to collaborate with Sofia Genetics (Hi Tamara!) to build MOKA, a software made on coffee (and not, it’s not an acronym eheh, where we had 3 patents) and which is still used by Sofia Genetics AFAIK.
Then my Seven Bridges years started, where I joined the London office very early on (hi Julia!) and we started to establish the foot print of Seven Bridges in UK and Europe (which at the time was still in the European Union). Lots of fun, proposing the platform to customers to have an easier, faster and reproducible way to do complex research. I’ve soon started to work with the Children Hospital of Philadelphia and the Cavatica platform (Hi Allison and Adam!). This was a phenomenal partnership, where we managed to push the boundaries of possibility, making it the best platform in the world to do research, while making sure that the whole field was advancing with us. Lots of colleagues who I shared really good time at SBG, starting with the folks in my team (hi Surya and Jared), the whole Program team, and the folks in Belgrade office.
This is way I’ve focused very early on on the standards, making sure we had open-standards that were possible to adopt by anyone, in a fast and easy way, and most importantly, they were solving a problem that people had.
This was done under the GA4GH umbrella (Hi Brian, Heidi, Ian, Kurt, David and all the GA4GH Community), where we have invented DRS, Passport, how to connect them, and how to connect these to FHIR. I called this strategy the interoperability triangle, and it was pretty well accepted both at Seven Bridges and also outside (It was adopted by the NIH, and it was also reported in the congressional papers in the senate of the United States of America.)
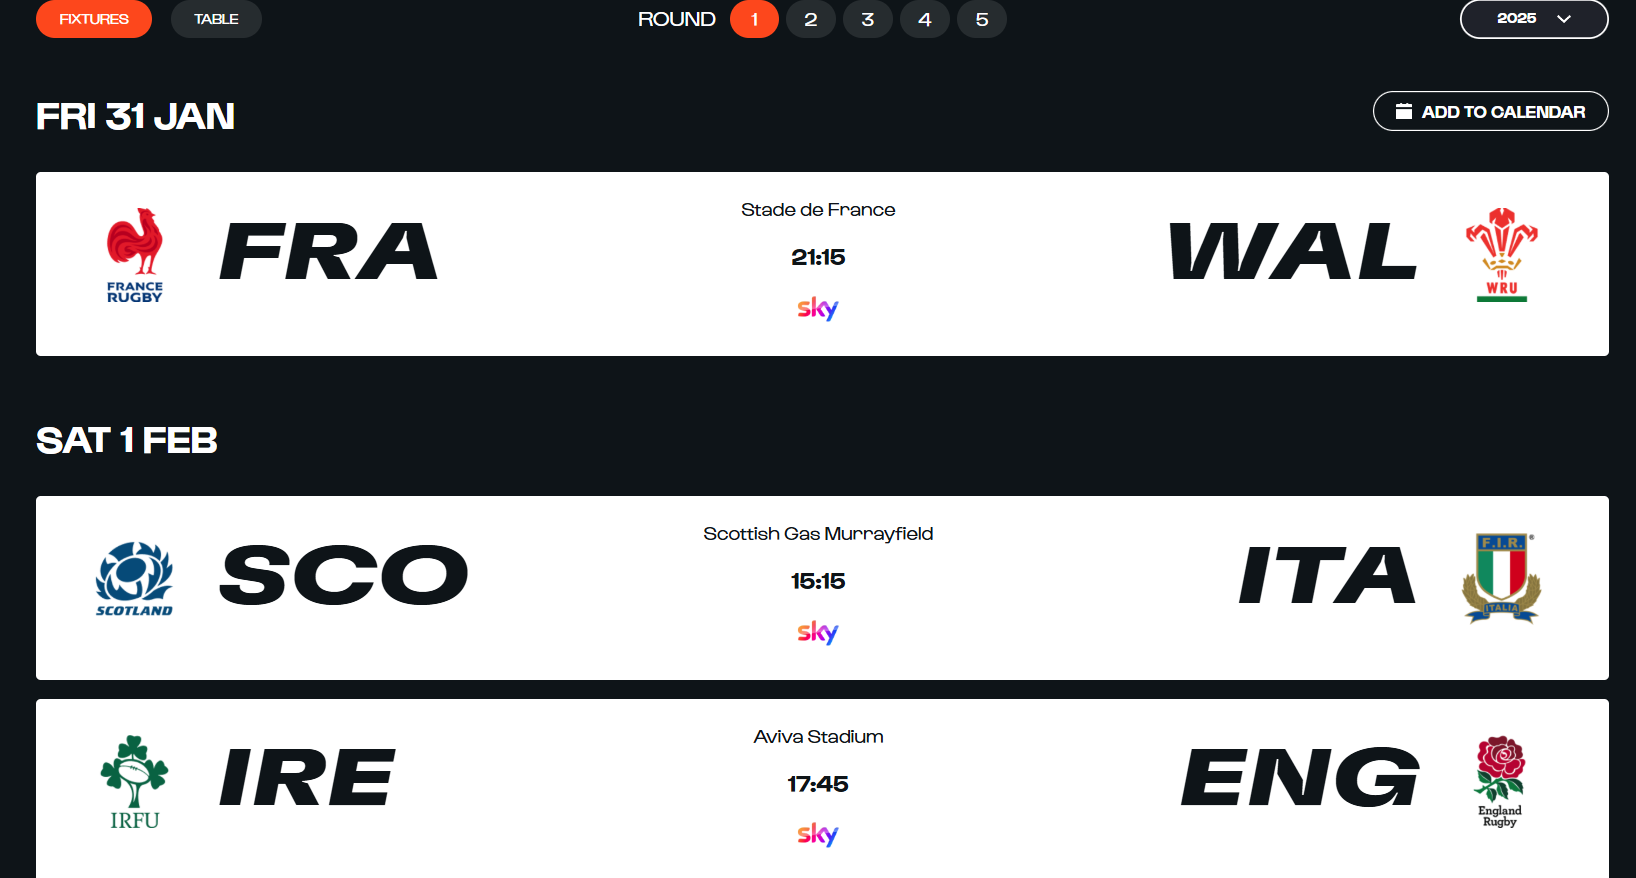
I was looking for a 6 Nations 2025 calendar in the `ics` format, so I could add it to my own google calendar, to have an idea who was playing and what time.
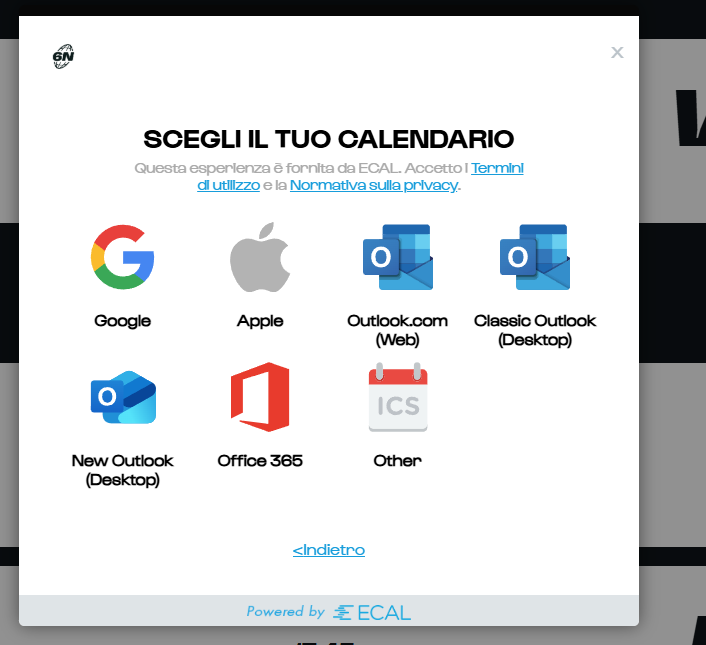
Do you want a calendar file? Give me all your information
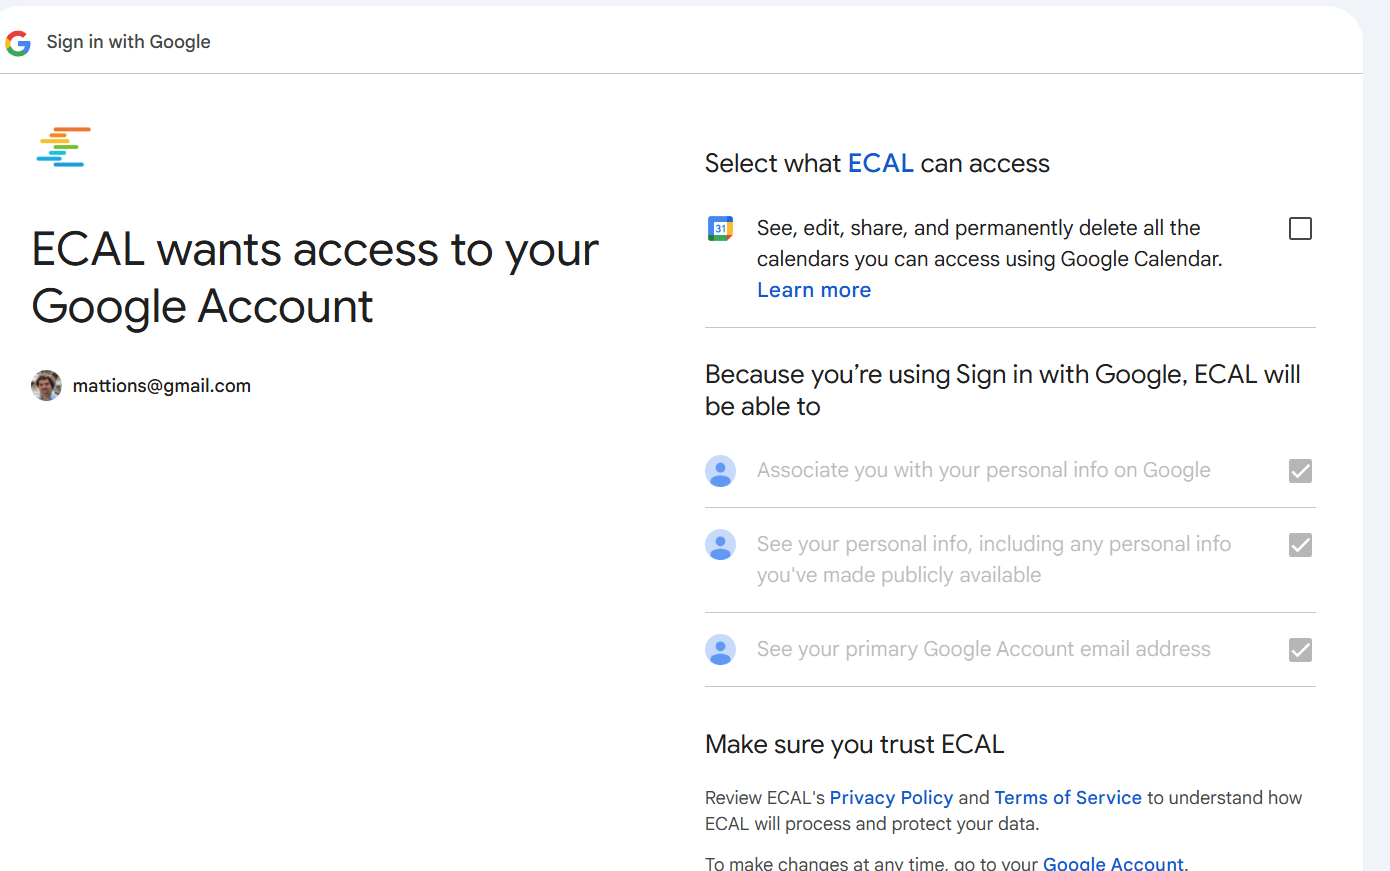
I was taken extremely disgusted by the approach taken by the folks at https://www.sixnationsrugby.com/en/m6n/fixtures/2025, who, when you try to add a calendar, instead of just giving you the file, ask you to provide access to all your google calendars (or equivalent) via the Ecal website.
The permissions required are way too broad for such type of request, and it makes no sense.
This is what you see when you try to add the calendar:
Picking google this is what you see:
To track some rugby matches, that are happening between Jan and March, this wants to have a constant access to all my calendars!
The only decent answer is no thank you.
Given the information are available, on when the matches are happening, written in several website, I took that info, I given to an AI and I had that generated the ics for me.
You can find it below. Simply import it in your calendar and should be good. As usual, Forza Azzurri 😀
The Problem: I have two massive blind rollers that are operated by hand. I would like to explore the possibility to lift them using a combination of electric motors and gears.
The main idea is to figure out how to achieve that with very small motors, and have a system that would work not too slowly to be completely useless.
Following the information provided in this post, the problem can be decomposed into two:
The torque of the model. With the right gearboxes also a small motor could lift (slowly) a heavy weight, so that is something that needs to be explored
The rate of which the motor can lift the weight.
While the first one is difficult to calculate, the main idea for the second can be calculated using the following formula:
\[
W= m g h \over t
\]
Where W is the power required to lift a mass m of an height h in a time t. It’s also possible to rewrite as the velocity v on which such mass gets lifted (because v = h/t):
\[
W = mgv
\]
So if we use 10Kg as weight, to lift this at a speed of 1 m/s would require a power:
\[
W = 10 \times 9.81 \times 1 = 98.1W
\]
This is just the beginning of the rabbit hole. I may post updates in the future if I will continue this. We will see.
Update: you can have only one py-script block for now. I removed the example one, and just left matplotlib example.
Pyscrypt has just been released and I feel I had to give it a go straight up from my blog.
The usage seems to be pretty straightforward:
you drop the link to the pyscrip.js in the HTML, and then you have the new <py-script> tag where you can write Python. Standard Python. For example the code below actually gets transformed into a string with the content Now you can!
from datetime import datetime
now = datetime.now()
#print("What time is it?")
#print("Computed directly from Python: " + now.strftime("%m/%d/%Y, %H:%M:%S"))

#print("Now you can use Python within the browser natively!")
Interestingly, you have the full Python arsenal at your disposal.
This code creates a matplotlib plot:
<pre>
<link rel="stylesheet" href="https://pyscript.net/alpha/pyscript.css">
<script defer src="https://pyscript.net/alpha/pyscript.js"></script>
<py-config>
      packages = ["matplotlib", "numpy"]
</py-config>
<div id="mpl"></div>
<py-script output="mpl">
import matplotlib.pyplot as plt
import matplotlib.tri as tri
import numpy as np

# First create the x and y coordinates of the points.
n_angles = 36
n_radii = 8
min_radius = 0.25
radii = np.linspace(min_radius, 0.95, n_radii)

angles = np.linspace(0, 2 * np.pi, n_angles, endpoint=False)
angles = np.repeat(angles[..., np.newaxis], n_radii, axis=1)
angles[:, 1::2] += np.pi / n_angles

x = (radii * np.cos(angles)).flatten()
y = (radii * np.sin(angles)).flatten()
z = (np.cos(radii) * np.cos(3 * angles)).flatten()

# Create the Triangulation; no triangles so Delaunay triangulation created.
triang = tri.Triangulation(x, y)

# Mask off unwanted triangles.
triang.set_mask(np.hypot(x[triang.triangles].mean(axis=1),
                         y[triang.triangles].mean(axis=1))
                < min_radius)

fig1, ax1 = plt.subplots()
ax1.set_aspect('equal')
tpc = ax1.tripcolor(triang, z, shading='flat')
fig1.colorbar(tpc)
ax1.set_title('tripcolor of Delaunay triangulation, flat shading')

fig1
</py-script>
</pre>
      packages = ["matplotlib", "numpy"]


import matplotlib.pyplot as plt
import matplotlib.tri as tri
import numpy as np

# First create the x and y coordinates of the points.
n_angles = 36
n_radii = 8
min_radius = 0.25
radii = np.linspace(min_radius, 0.95, n_radii)

angles = np.linspace(0, 2 * np.pi, n_angles, endpoint=False)
angles = np.repeat(angles[..., np.newaxis], n_radii, axis=1)
angles[:, 1::2] += np.pi / n_angles

x = (radii * np.cos(angles)).flatten()
y = (radii * np.sin(angles)).flatten()
z = (np.cos(radii) * np.cos(3 * angles)).flatten()

# Create the Triangulation; no triangles so Delaunay triangulation created.
triang = tri.Triangulation(x, y)

# Mask off unwanted triangles.
triang.set_mask(np.hypot(x[triang.triangles].mean(axis=1),
                         y[triang.triangles].mean(axis=1))
                < min_radius)

fig1, ax1 = plt.subplots()
ax1.set_aspect('equal')
tpc = ax1.tripcolor(triang, z, shading='flat')
fig1.colorbar(tpc)
ax1.set_title('tripcolor of Delaunay triangulation, flat shading')
display(fig1, target="graph-area", append=False)
Note: If you are trying to use the <py-script></py-script> on wordpress, using a Custom element block, you need to wrap the code with <pre></pre> otherwise wordpress will texturize the text, changing the characters to some more pleasing to the eye. However the HTML is actually executed by the py-script and it will not understand this link.
I had to move to a Windows 10 computer for work, and even if I’m not working a lot on code and so forth, I need sometime to create an ipython notebook or try to launch some code I’ve got from github.
Having the ability to install the ubuntu distribution via the WSL2, directly form the Microsoft Store is a great help. The ability to use Visual Studio which connects to these “magic” area of the filesystem makes also the editing nice and easy.
Usually I like to go with the console, and I’m using the Windows Terminal, which is able to launch several environments in a native way.
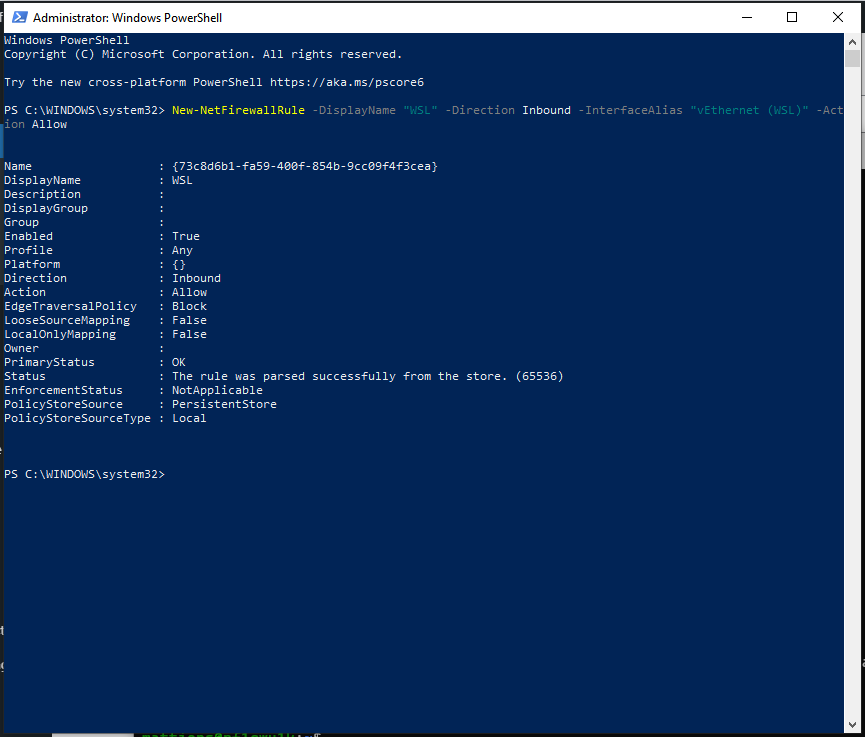
However there is a little snag: you cannot contact the outside world or the internet, because by default the Windows firewall says no.
It’s easy to fix, thogh: Open the PowerShell as Administrator and launch:
After that, you are golden. Unfortunately, for me, I have to re-run that every time I re-boot or come back from a Suspend. I would be very interesting to know if someone figure out how to do it in a permanent way.
So I’ve got this new computer with Windows 10 because Baldurs Gate 3 is coming out, and I did not have a tower for quite long time. The windows has been installed by the people where I’ve got it, and there is a second partition where I will install ubuntu. Unfortunately on the first go it did not work due to the NVIDIA card inside, (just a GTX 1060, not the new 30 series that everyone is going crazy about it), but the net has already a solution for it, which I will give it a try ASAP I’ve got time.
At the same time I’ve used it to play Heroes of the Storm and I’ve also tried my first stream on twich.tv at https://www.twitch.tv/brownianmotion1 . I stream HOTS in Italian, and it just a quick foray into that world because I’m a curious person.
I’ve used OBS to stream, and it seems everything was working quite well.
Back to the Ubuntu install, given the first try did not really work, I wanted to take a more cautious approach and save the windows key before I had to reinstall everything again, for safe-keeping.
To my surprise new rigs do not came with a sticker which says which is the windows key associated, but it’s written in the UEFI BIOS directly. When I’ve asked the support of the company where to get it, they told me this was attached only to that mother board, and if I was going to change the motherboard I had to get a new one.
While this makes no sense to me at all, given that I bought a personal license for windows, I was not very clear why I should not know the key of the license I bought.
Quick googling (via ecosia) and I found out this video on youtube which provides the solution in no time:
Open A PowerShell and type (Get-WmiObject -query 'select * from SoftwareLicensingService').OA3xOriginalProductKey
Some time ago, I’ve described what was the initial work done on the gardenio system to have smart plant monitoring in the house.
Today I’ve open-sourced the code. You can find gardenio on gitlab, and also the code for django website connected to it as well. At the moment the arduino bits have been disbanded, but it’s handy to have it out there as a possible blueprint for projects of this type.
The whole system was run using ROS1 and it’s handy to have it open to be used as an example for the next work that will go towards the Dimitra project.
BTW, if you are interested in collaborating on agritech solutions, which involves automatic robotic system applied to urban and small scale agriculture, just give me a shout.
If you were curios, that’s what the Dimitra project is all about.
First of all we have moved country! We left London and the UK, being part of the secret Brexodus tribe which does not get talked about it too much by the media, and we moved to Ancona in Italy. If you wondering, the Brexodus tribe is all the people that decided to leave Brexit land for safer/better places; given the fair amount of people, usually with diverse jobs and across the board, we have renamed this internally the Brexodus, the Exodus from Brexit. We do not of course know each other (unless in a very small amount of groups, but this is a clear phenomenon which will become more clear going forward).
Several reasons did contribute to this decision. We literally moved just before the “original” Brexit deadline was supposed to arrive (the 29th of March), and we actually took off for good on the 21st of March, landing in Italy the same day (of course :)).
We could have gone for settled status in UK maybe, but you never know with the UK Home Office and the UK Government what they will do. To be fairly honest we never really investigated too much what we had to do. We didn’t feel like London was anymore the best place to live. More over our rights have been stripped away in one night via a referendum on which we couldn’t even vote, and which has basically changed everything. Therefore why waste time on that?
Honestly, given the latest news, I have no idea what the UK will do. However we know what Earth will do 😀
When I started this post, I wanted to write about three things not really related:
the move, which I wrote above
some changes on the ads shown here, which made me think about the move
some robotics news I’ve read today that I found interesting (related to the last blog post I wrote, that’s why they pop up)
So here we go with the last two.
Regarding the ads, I used to have an AdSense ad on the sidebar. I’ve set it up long time ago, and if you are interested why, I’ve written in this very old post. Changing country I had to close it down, and I do not feel it would make sense to bring it back, therefore, from today, the Sidebar does not show ads anymore. Given that I run the blog myself on a dedicated server, no more ads on this pages will be shown for the time being.
On the robotics side, as I have written before on the plants post, I’m looking into building an automatic robots for agriculture with wheels, and I’m interested in ROS2 development to do that part. Today I’ve discovered that Acutronics has closed down. I was really interested by the work they were doing, and the arm that they have developed was ROS2 compatible. It seems they did not manage to get enough funding to go ahead. A pity, they were doing a really great job.